TL;DR
- Every low-code tool has a ceiling. Most hand you a second system when you hit it: a scripting sidecar, a webhook, another automation service. InfoLobby's visual bricks compile to PHPScript, the same language Code Mode runs, so there is nothing new to learn at the boundary.
- We built a purchase approval workflow visually, tested both paths, then hit a policy with five interacting rules. The bricks could still express it, but the tree became hard to follow.
- Convert to Code turned the flow into readable PHPScript with the same structure and variable names. We rewrote the policy as one array of reasons and a single decision.
- Conversion is one-way. Clone the visual flow first if you want to keep it.
- Start visually, move to code when the complexity justifies it. You do not have to decide up front.
Visual workflow builders make it easy to automate business processes without writing code. You connect actions, add conditions, and define what should happen when a record changes.
But business requirements rarely stay simple.
A workflow that starts with a few conditions can eventually grow into dozens of branches, variables, and interconnected rules. The builder may still support everything, but maintaining the logic visually becomes increasingly difficult.
Moving the logic into code can be easier. But on many platforms, that means introducing a separate scripting environment, webhooks, or another automation service.
InfoLobby takes a different approach.
Its visual flow builder generates PHPScript, the same language used in Code Mode. You can start building visually, switch to code when you need more control, and continue working with the logic you've already created.
Let's demonstrate this with a purchase approval workflow.
Building a purchase approval system
Consider a company where employees submit purchase requests for equipment, software, supplies, and other business expenses.
The company has several departments, each with its own monthly budget. Employees belong to departments, and every purchase request is associated with an employee.
We'll use three tables in InfoLobby:
- Departments: Department name, monthly budget, and manager.
- Employees: Employee details and their department.
- Purchase Requests: Employee, description, amount, submission date, and approval status.
The initial requirement is straightforward.
When an employee submits a purchase request:
- If the amount is below £1,000, approve it automatically.
- If the amount is £1,000 or more, create an approval task for the department manager.
- Update the purchase request status accordingly.
We'll build this using the visual flow builder.
Step 1: Create the visual automation
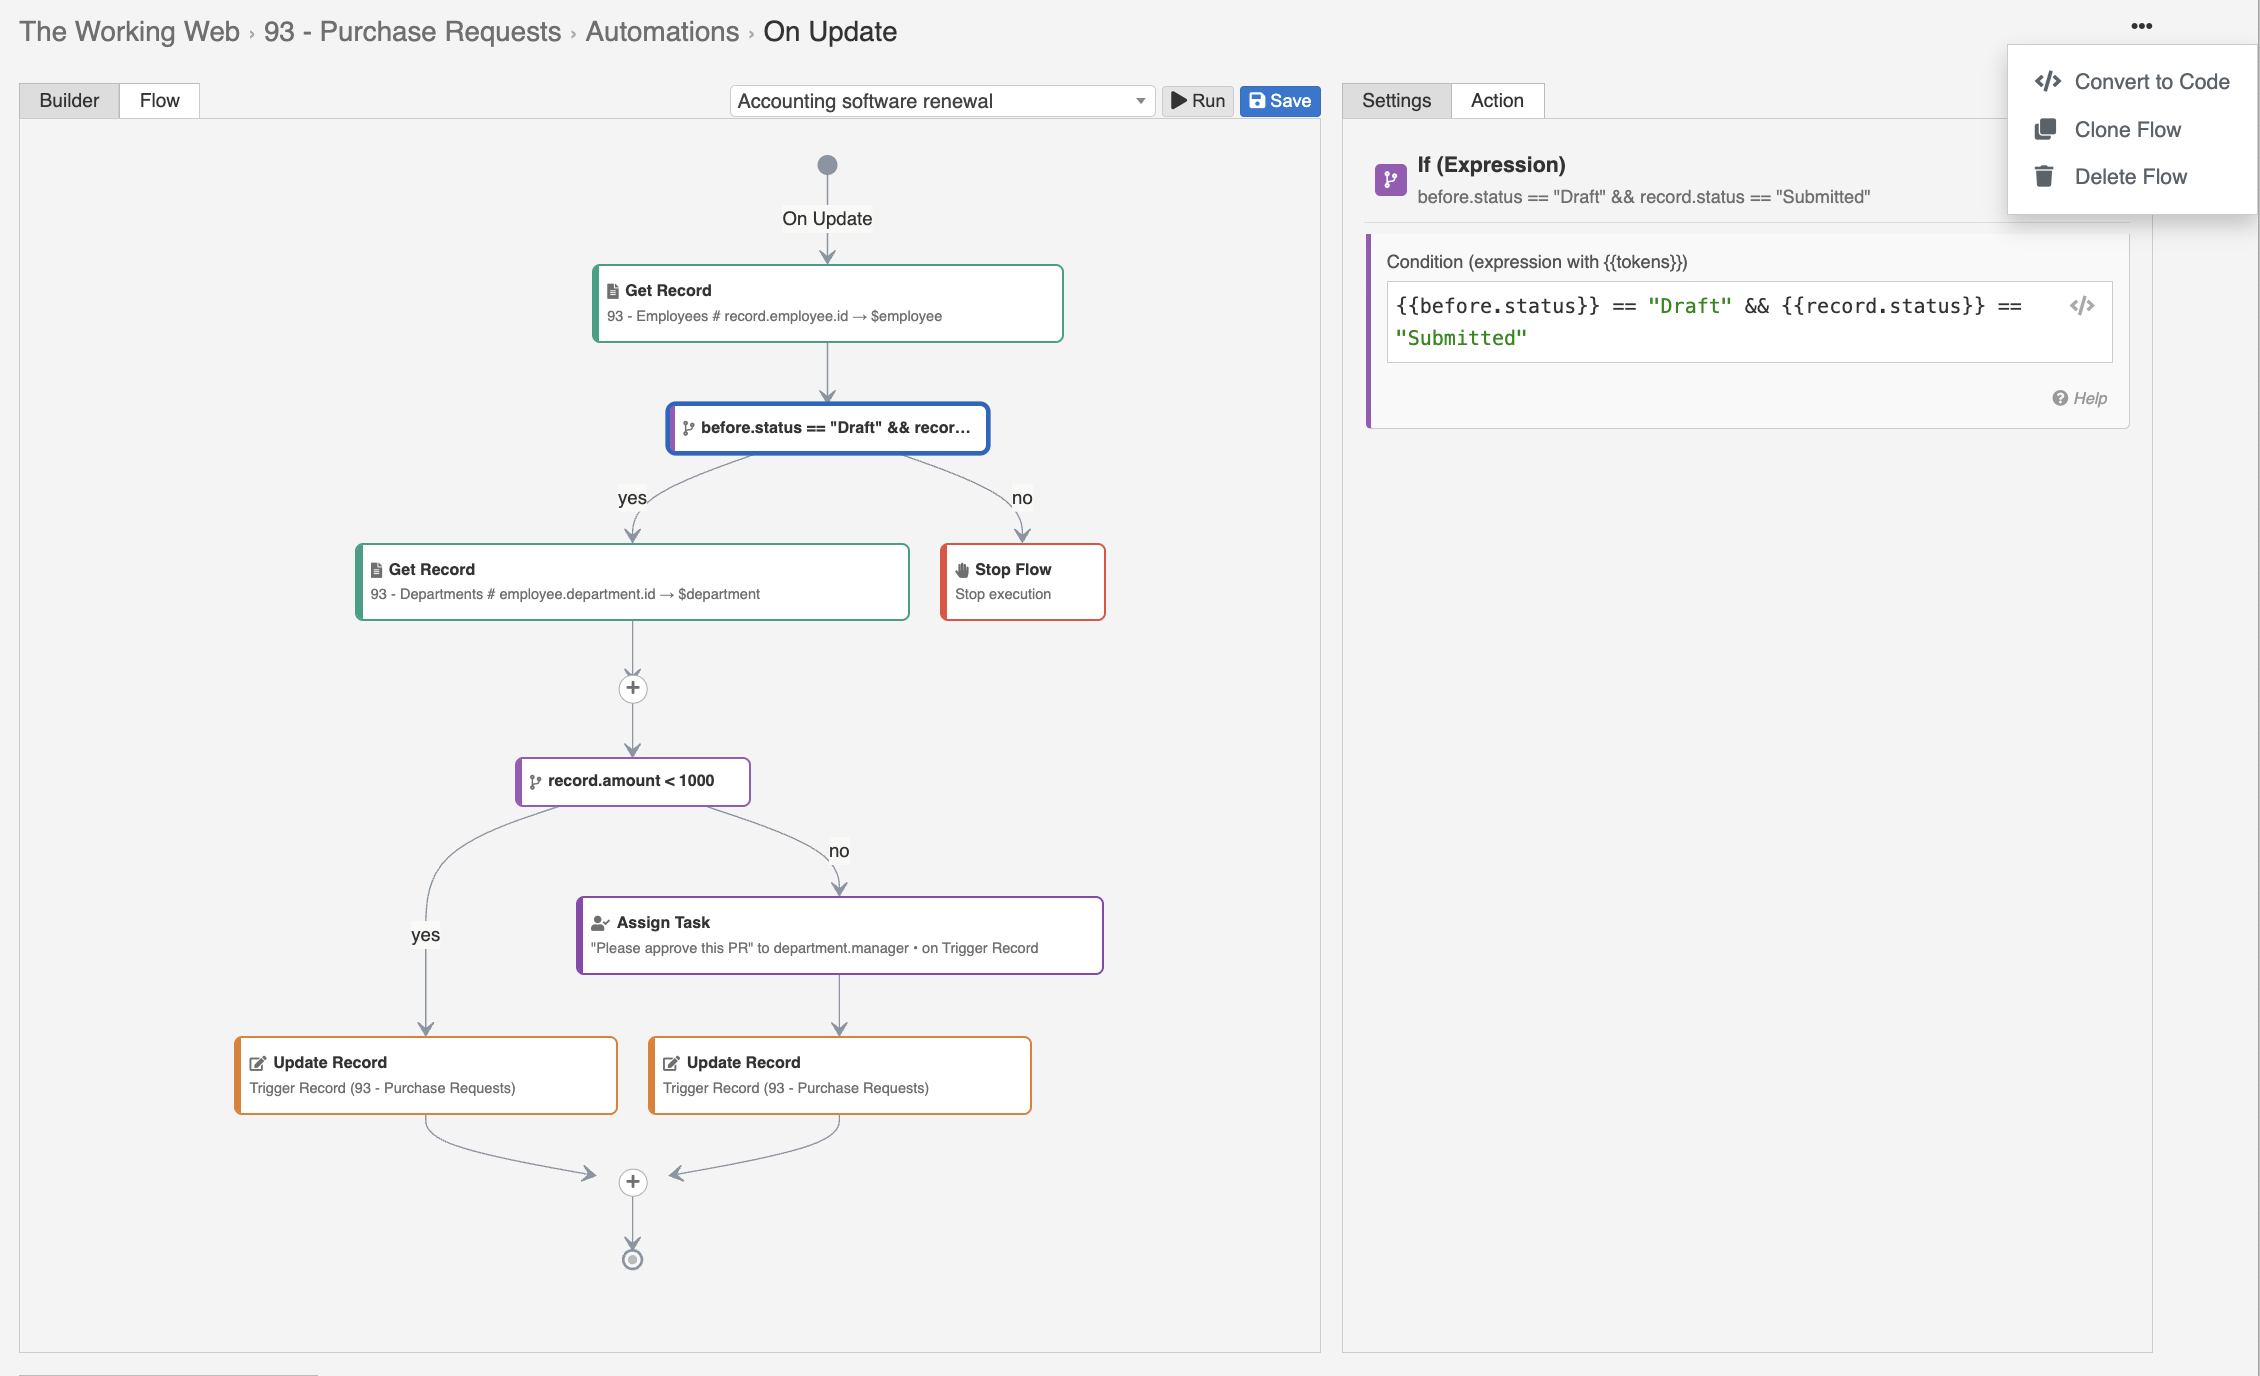
In the Purchase Requests table, I created an automation called Approve or Request Approval.
The automation uses the On Update trigger, which runs when a purchase request is modified.
We only want to process a request when its status changes from Draft to Submitted. This prevents the approval logic from running on unrelated updates.
The flow starts by retrieving the employee associated with the purchase request.
Next, it checks two conditions:
- Was the previous status
Draftand the new statusSubmitted? - Is the purchase amount below £1,000?
If the request is below £1,000, the flow updates its status to Approved.
Otherwise, it retrieves the employee's department, creates an approval task for the department manager, and changes the status to Waiting for Approval.
If the status transition doesn't match, the flow stops.
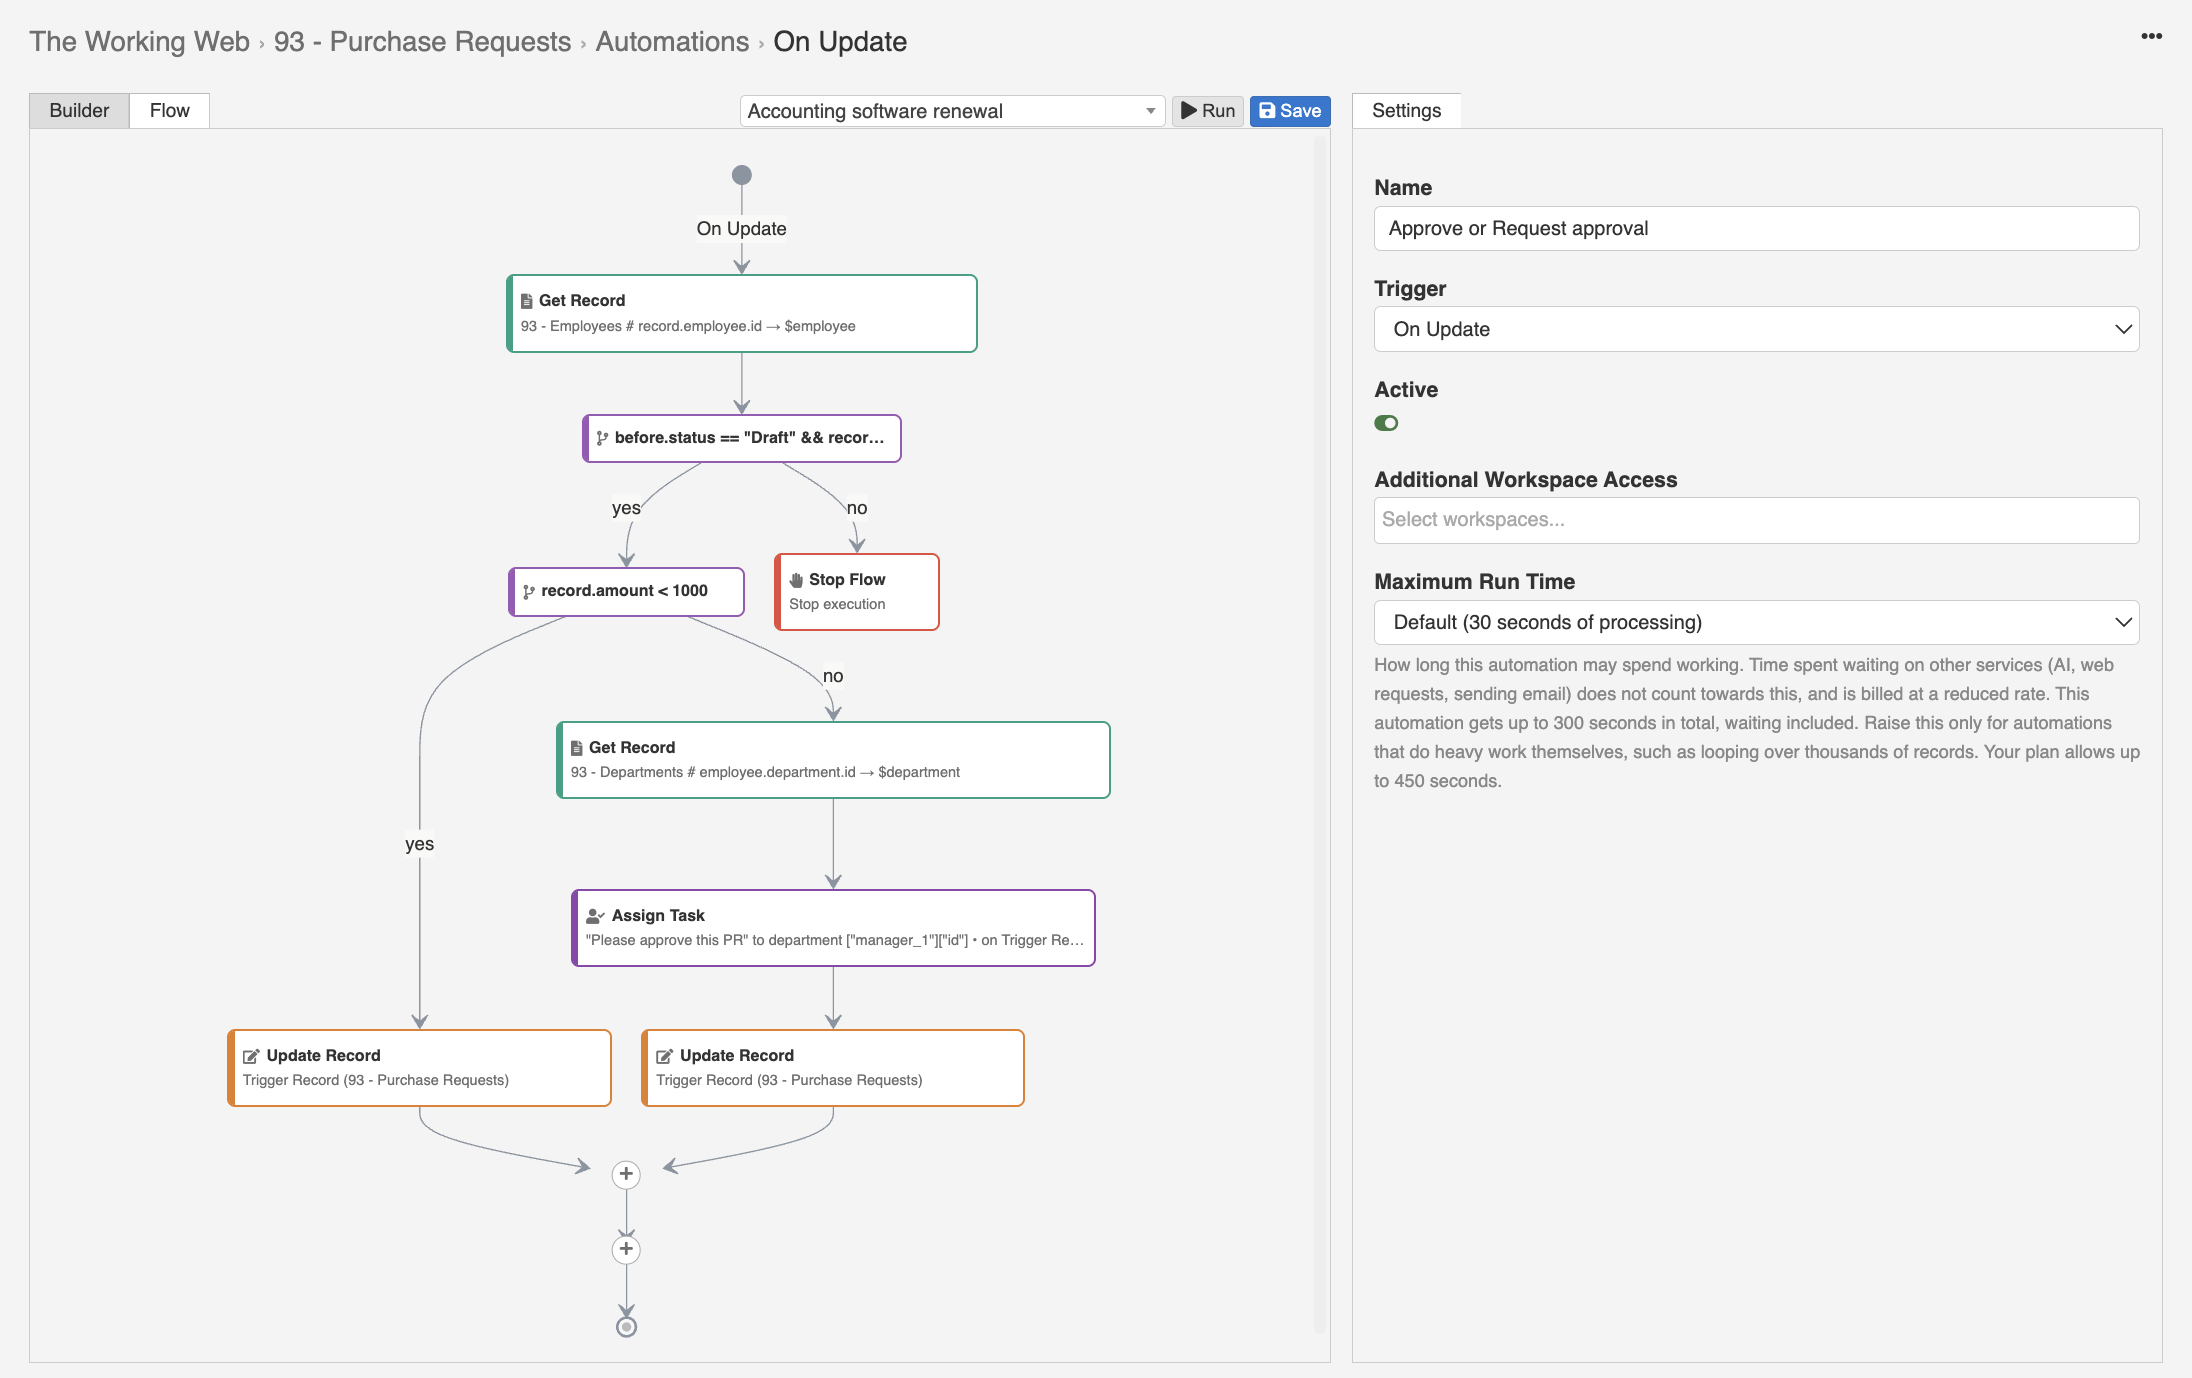
This is a working automation built entirely using visual bricks. It includes record lookups, conditional branching, task assignment, record updates, and a stop condition.
No code was needed.
Step 2: Test the visual workflow
Let's test both approval paths.
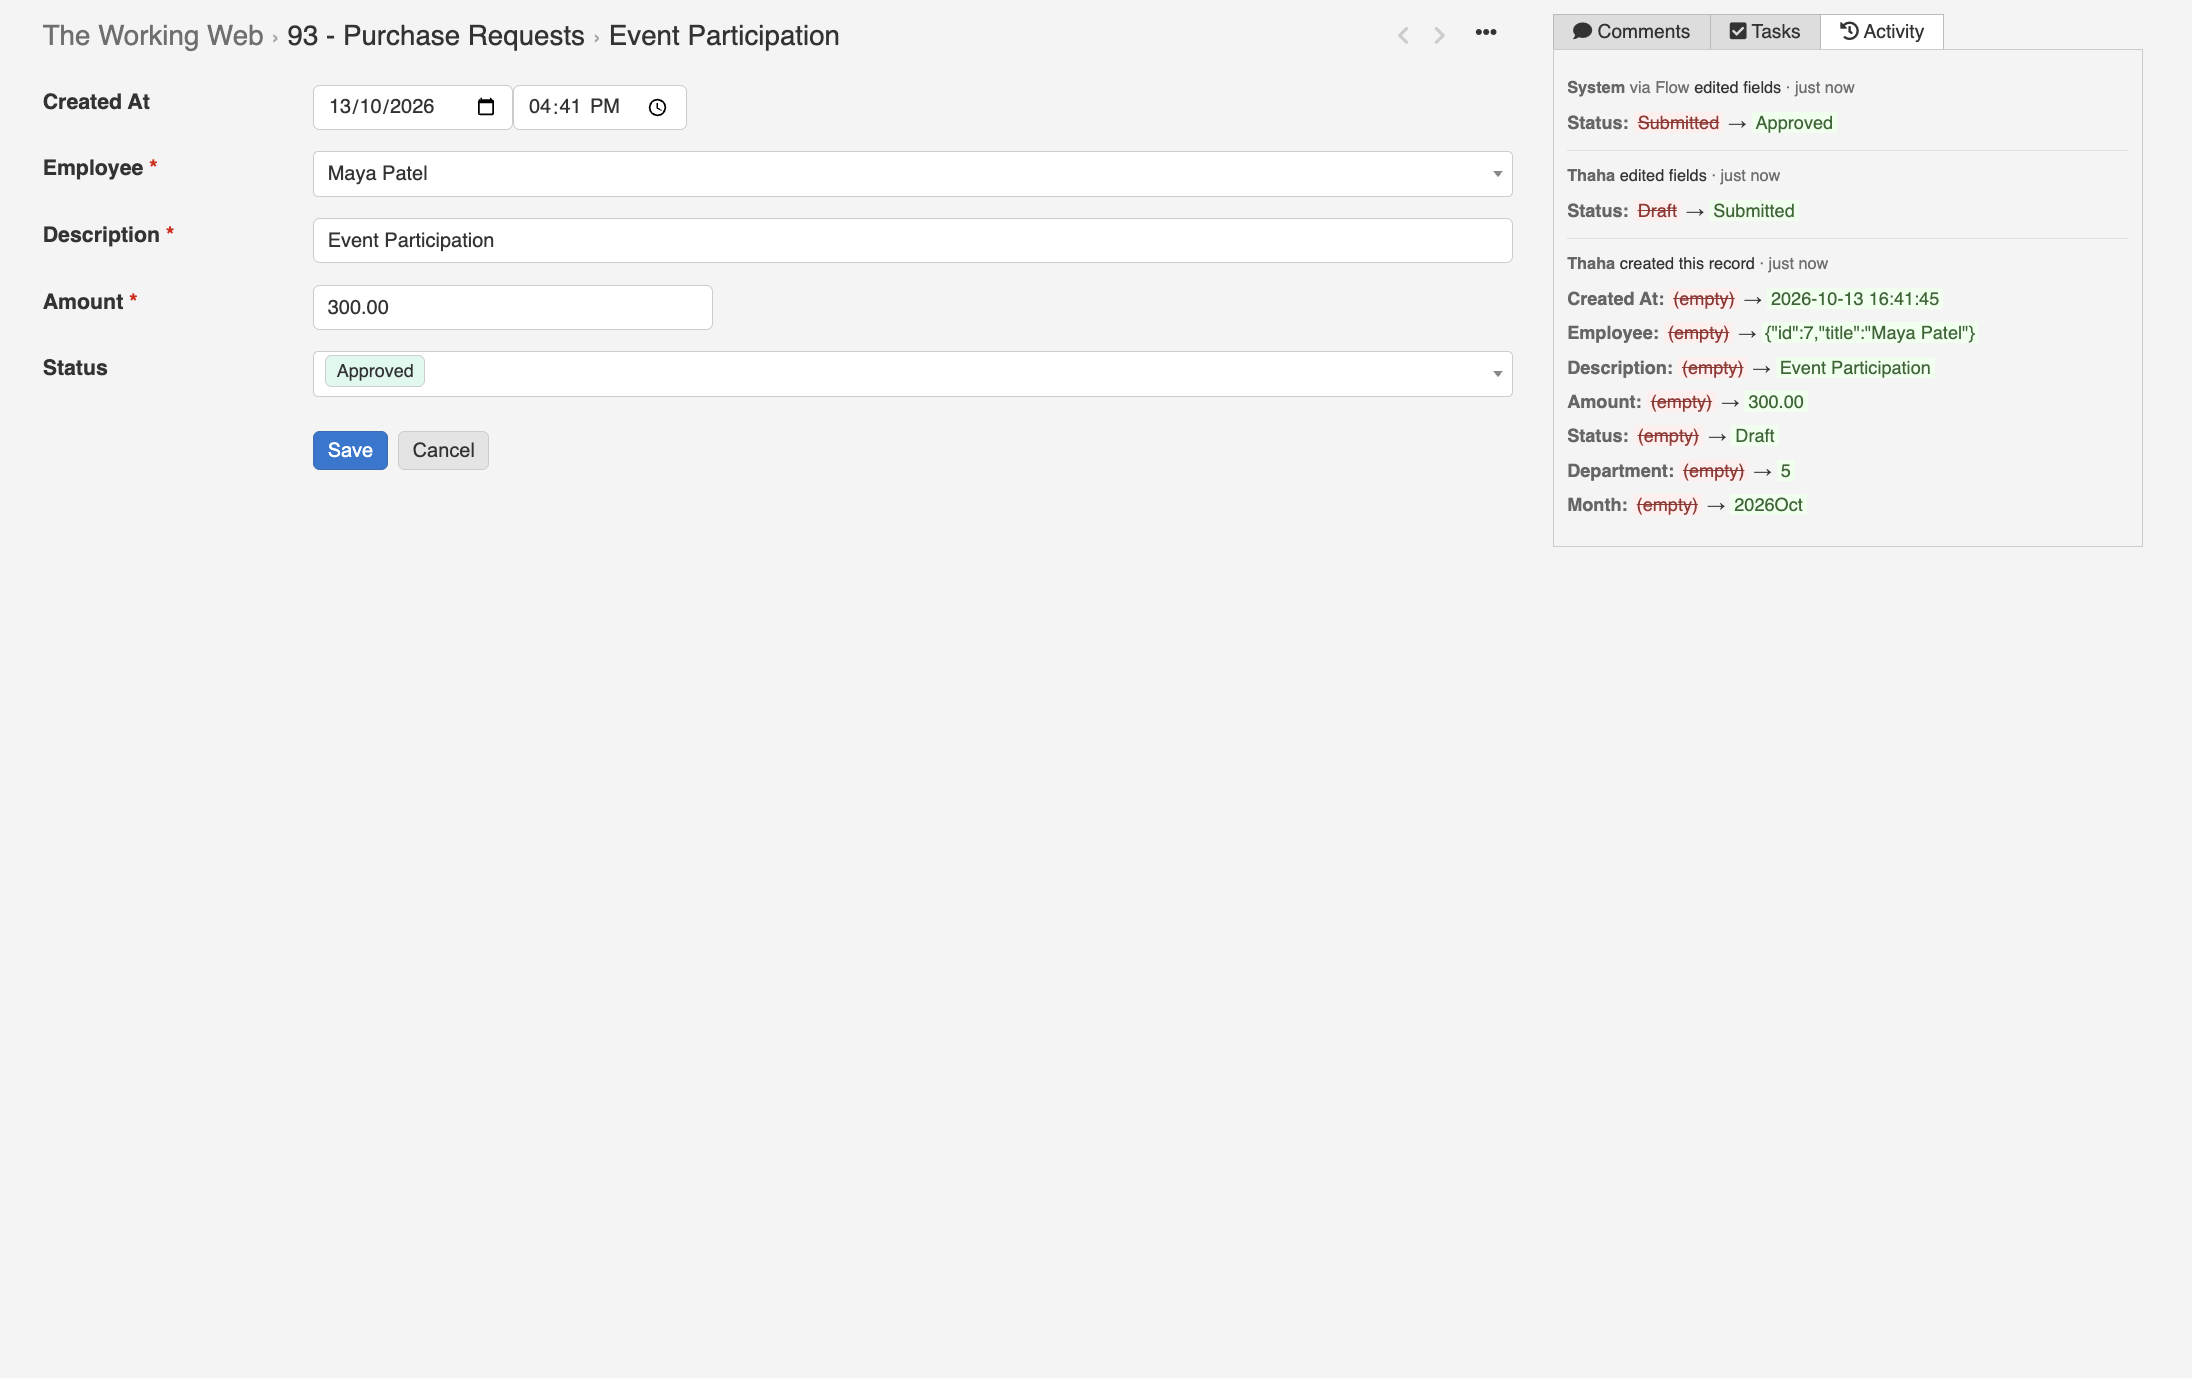
Test A: A small purchase
Maya Patel from Human Resources submits a purchase request for £300 to cover event participation.
The request starts in Draft. When we change its status to Submitted, the automation runs.
Because £300 is below the £1,000 threshold, the flow automatically approves the request.
The activity history confirms the transition:
Draft → Submitted → Approved
Test B: A purchase requiring approval
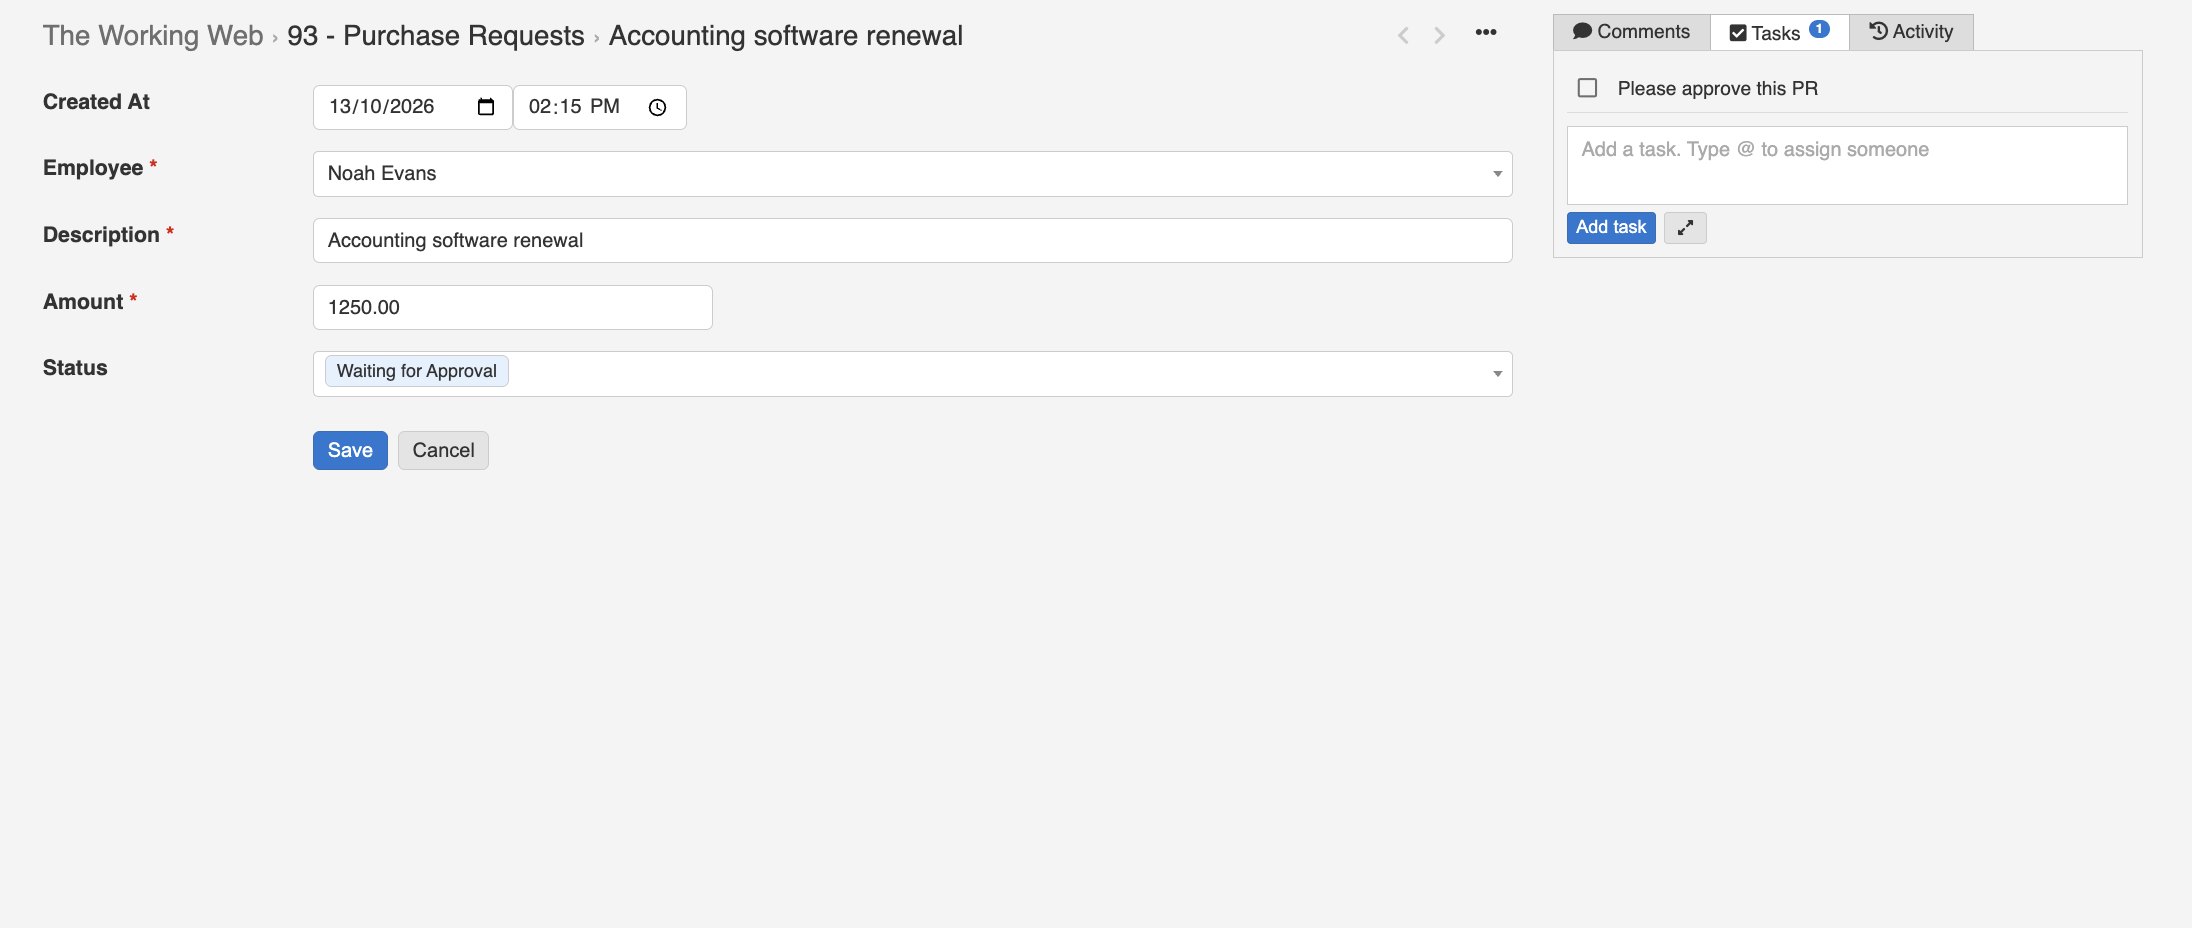
Noah Evans from Finance submits a £1,250 request for an accounting software renewal.
This time, the amount exceeds the automatic approval threshold.
The automation retrieves the department, creates a task titled Please approve this PR, and updates the request to Waiting for Approval.
Both tests work as expected.
We now have a functional purchase approval workflow that routes requests based on their value.
Step 3: The requirement gets more complicated
The company introduces a more detailed purchasing policy.
The new approval rules are:
- Standard threshold: Purchases below £1,000 qualify for automatic approval.
- IT exception: IT purchases above £500 require manager approval, even when below the standard threshold.
- Department budget: Purchases that would push monthly departmental spending to 80% of the budget or more require manager approval.
- Employee purchase frequency: Employees who already have three or more approved purchases this month require manager approval.
- Combined reasons: When several rules apply, create only one approval task for the manager and include every reason approval is required.
Each rule is reasonable on its own.
The challenge is evaluating them together.
A £750 IT purchase might trigger both the IT threshold and the budget rule. We don't want two separate approval tasks. We want one task explaining both conditions.
Implementing the rules visually
We can build this using the visual flow builder.
We add conditions to check the purchase amount and department. We introduce variables to track which rules are triggered. We retrieve purchase history and evaluate the department's budget utilisation.
Each additional requirement adds more steps, branches, and connections.
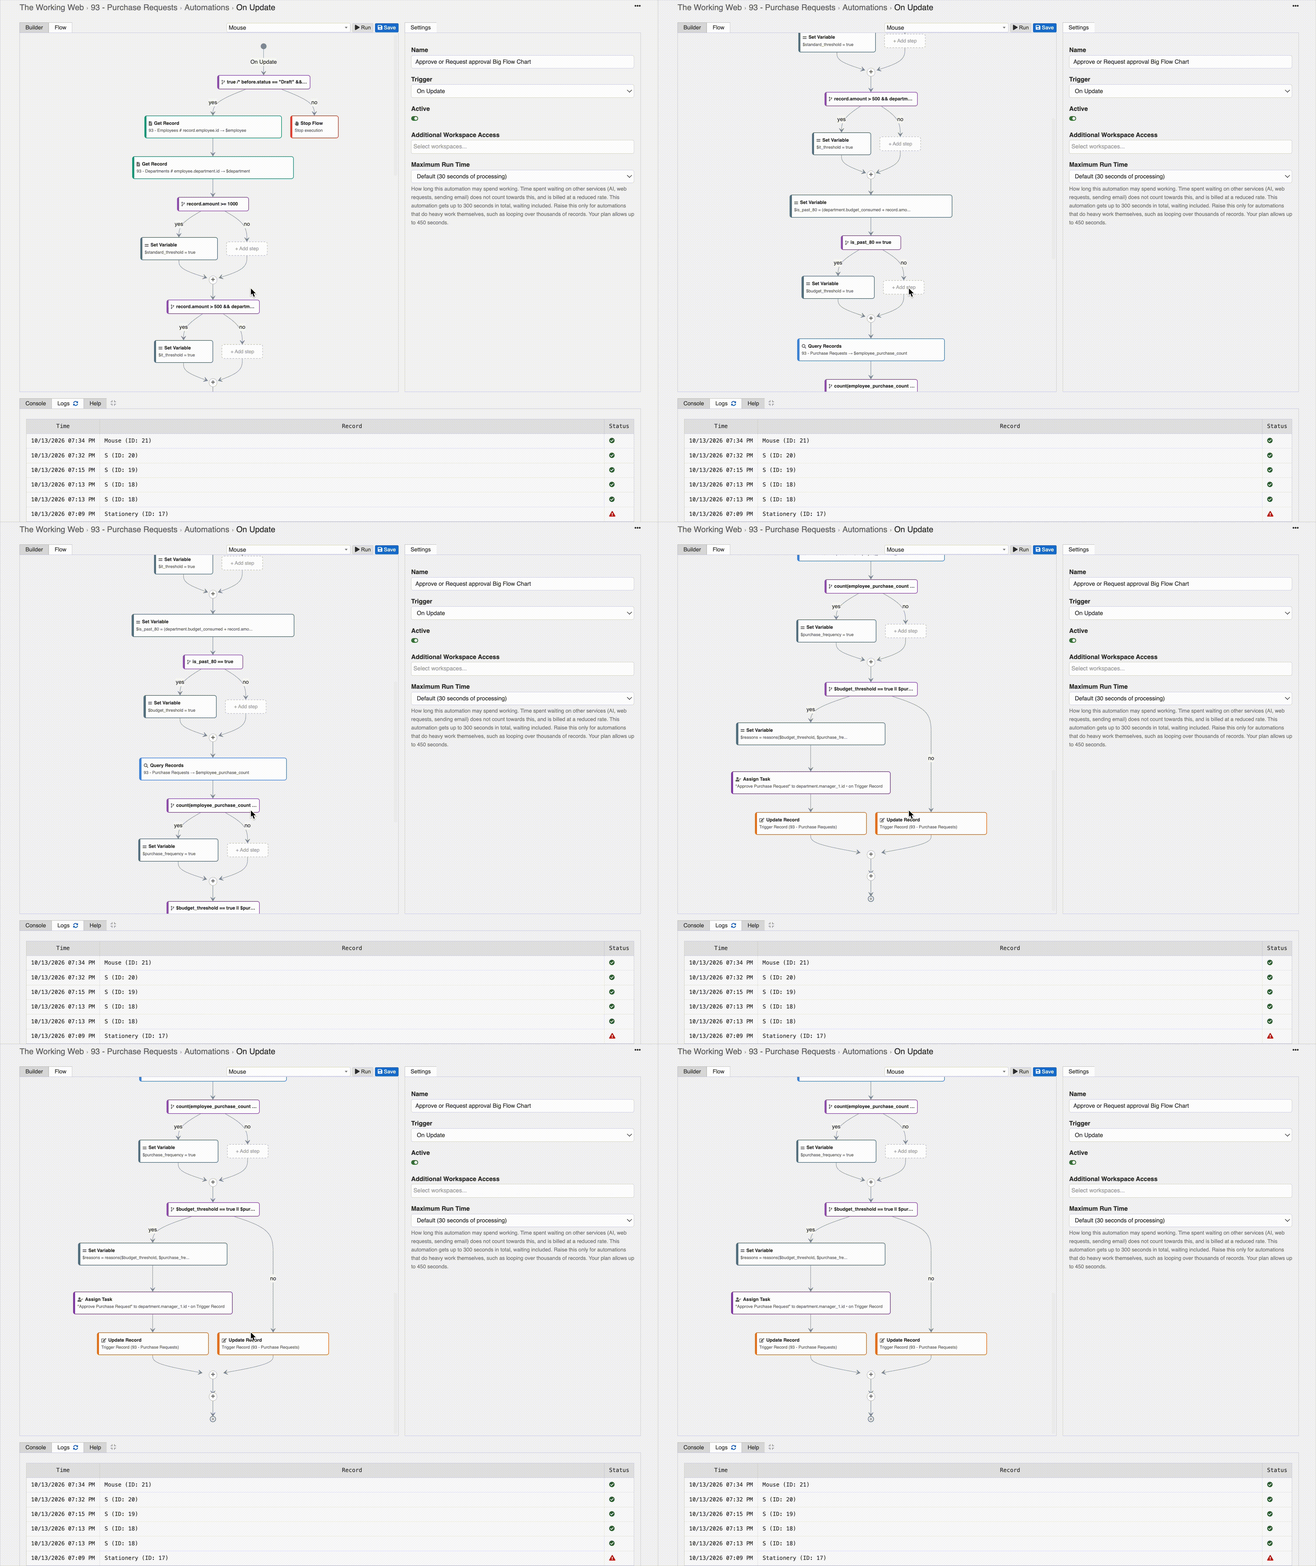
The visual builder can handle these operations. It supports conditions, variables, arrays, record queries, and loops.
But look at how much larger the flow has become.
The original automation was easy to understand at a glance. The extended version requires scrolling through a much larger tree to follow the logic.
And this is still a relatively small set of business rules.
We could continue building visually, but at this point, the same logic is easier to express and maintain in code.
Step 4: Switch from the visual builder to Code Mode
Let's go back to the original two-path flow and see how InfoLobby lets us extend it in code instead.
In the visual flow builder, open the three-dot menu in the top-right corner and select Convert to Code.
InfoLobby displays a confirmation dialog containing a preview of the generated PHPScript.
There's an important detail here: conversion is one-way.
Once a visual flow is converted to PHPScript, you cannot switch it back to the visual builder.
For that reason, I generally clone the working visual flow before converting it. This preserves the original automation, so I can refer to it or continue making visual changes if needed.
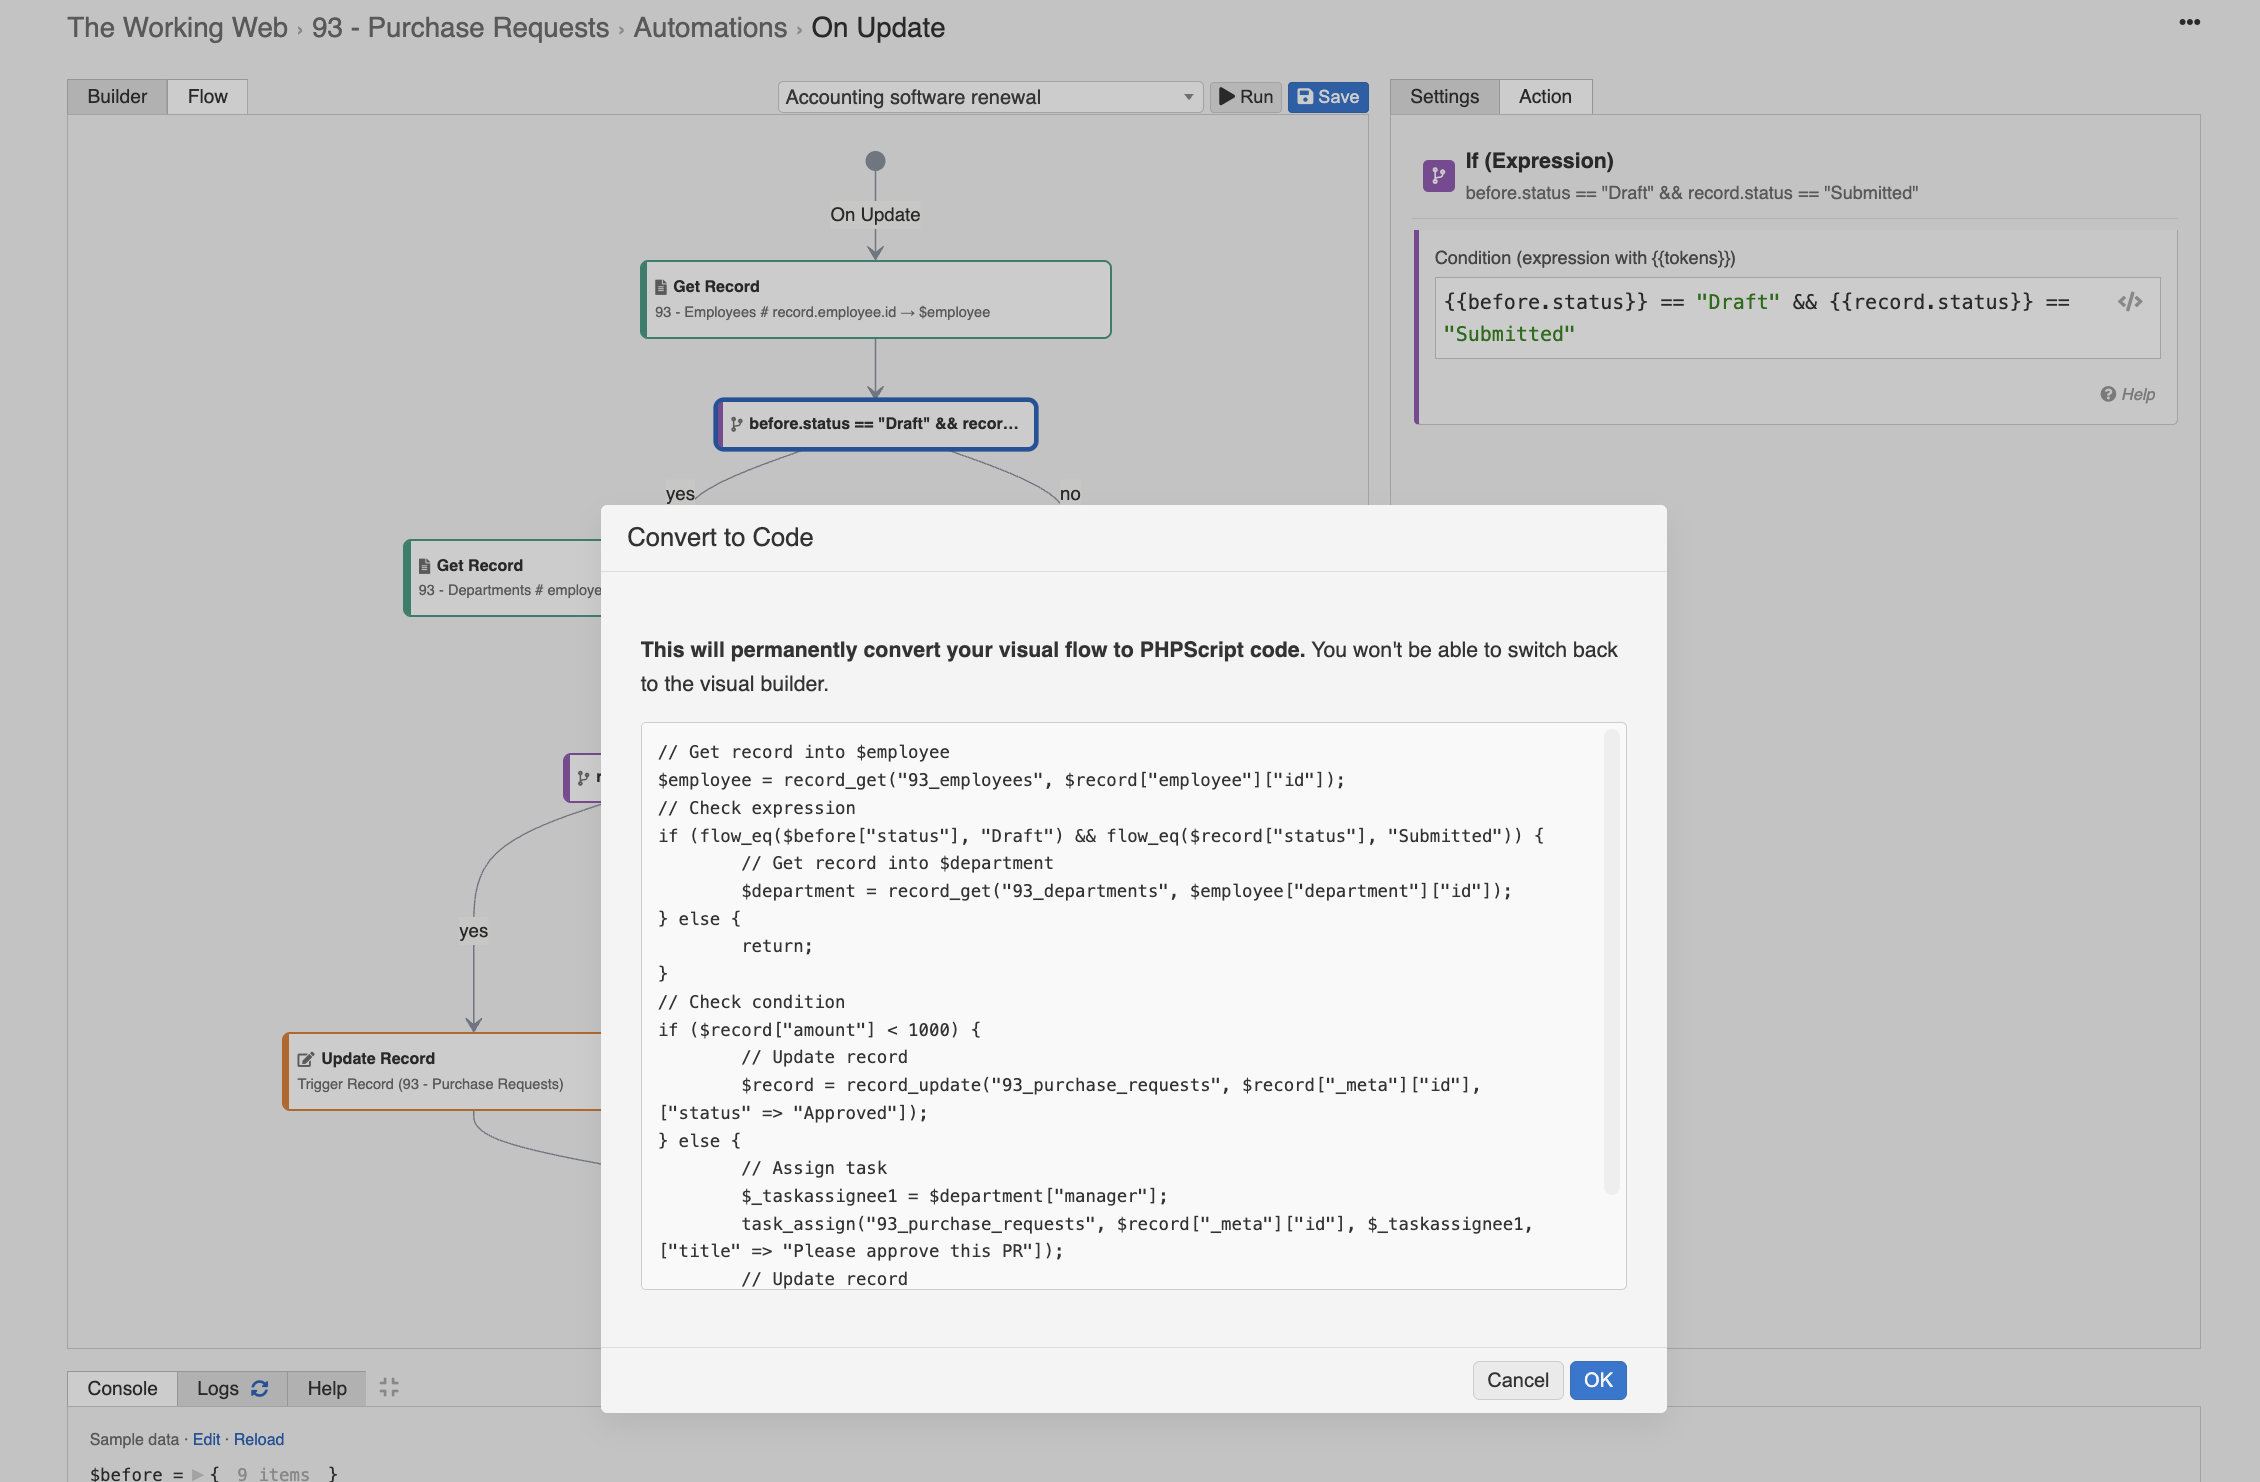
After confirming, the flow opens in Code Mode.
What makes this useful is that InfoLobby hasn't created a separate automation or introduced a different programming language. The visual bricks have been translated into PHPScript, which runs in the same automation environment.
Here's the generated code:
// Get record into $employee
$employee = record_get("93_employees", $record["employee"]["id"]);
// Check expression
if (flow_eq($before["status"], "Draft") && flow_eq($record["status"], "Submitted")) {
    // Check condition
    if ($record["amount"] < 1000) {
        // Update record
        $record = record_update("93_purchase_requests", $record["_meta"]["id"], ["status" => "Approved"]);
    } else {
        // Get record into $department
        $department = record_get("93_departments", $employee["department"]["id"]);
        // Assign task
        $_taskassignee1 = $department["manager_1"]["id"];
        task_assign("93_purchase_requests", $record["_meta"]["id"], $_taskassignee1, ["title" => "Please approve this PR"]);
        // Update record
        $record = record_update("93_purchase_requests", $record["_meta"]["id"], ["status" => "Waiting for Approval"]);
    }
} else {
    return;
}
The code follows the same structure as the visual flow.
The Get Record brick becomes a record_get() call. The conditional branches become if statements. Record updates use record_update(), and task assignment uses task_assign().
Even the variables are carried across, including $employee, $department, and $record.
There is no need to reconstruct the original workflow. We can read the generated code, understand what each section does, and modify it directly.
Step 5: Simplify the approval logic in PHPScript
Now let's express the expanded approval policy directly in code.
Rather than translating every visual branch into another code branch, I reorganised the logic around a single array of approval reasons. Each rule contributes to that array, and one final operation determines whether approval is required.
Here's the core of the revised automation:
if ($before["status"] != "Draft" || $record["status"] != "Submitted") return;

$employee = record_get("93_employees", $record["employee"]["id"]);
$dept = record_get("93_departments", $employee["department"]["id"]);
$amount = $record["amount"];
$reasons = [];

if ($amount >= 1000)
    $reasons[] = "Purchase ≥ £1,000";

if ($amount > 500 && $dept["name"] == "IT")
    $reasons[] = "IT purchase > £500";

if ($dept["monthly_budget"] > 0 &&
    ($dept["budget_consumed"] + $amount) / $dept["monthly_budget"] >= 0.8)
    $reasons[] = "Budget exceeds 80%";

$purchases = records_query("93_purchase_requests", [
    ["field" => "status", "op" => "=", "value" => "Approved"],
    ["field" => "employee", "op" => "=", "value" => $record["employee"]["id"]],
    ["field" => "month", "op" => "=", "value" => date('YM')]
]);

if (count($purchases) >= 3)
    $reasons[] = "3 or more purchases this month";

if ($reasons) {
    task_assign("93_purchase_requests", $record["_meta"]["id"],
        $dept["manager_1"]["id"],
        ["title" => "Approve Purchase Request", "details" => implode(", ", $reasons)]);
}

record_update("93_purchase_requests", $record["_meta"]["id"],
    ["status" => $reasons ? "Waiting for Approval" : "Approved"],
    ["silent" => true]);
The logic is straightforward.
We start with an empty $reasons array. Each business rule is evaluated independently. When a condition is met, we add an explanation to the array. The purchase history check is a single records_query() call.
At the end, we make one decision.
If the array is empty, the request is approved automatically.
If the array contains one or more reasons, we create a single approval task for the department manager and set the request to Waiting for Approval.
There is no need to create separate task-assignment branches for every combination of conditions.
And because all the reasons are collected in one place, the manager can see exactly why the request needs attention.
Step 6: Test the extended automation
Let's submit a £750 purchase request for a keyboard from the IT department.
The request is below the standard £1,000 threshold, so it would have qualified for automatic approval under our original workflow.
But the new policy has additional conditions.
The request exceeds the £500 IT threshold, and the department's projected spending exceeds 80% of its monthly budget.
The automation evaluates both conditions and creates one task for the department manager.
The task contains:
Title: Approve Purchase Request
Details: IT purchase > £500, Budget exceeds 80%
The purchase request status changes to Waiting for Approval.
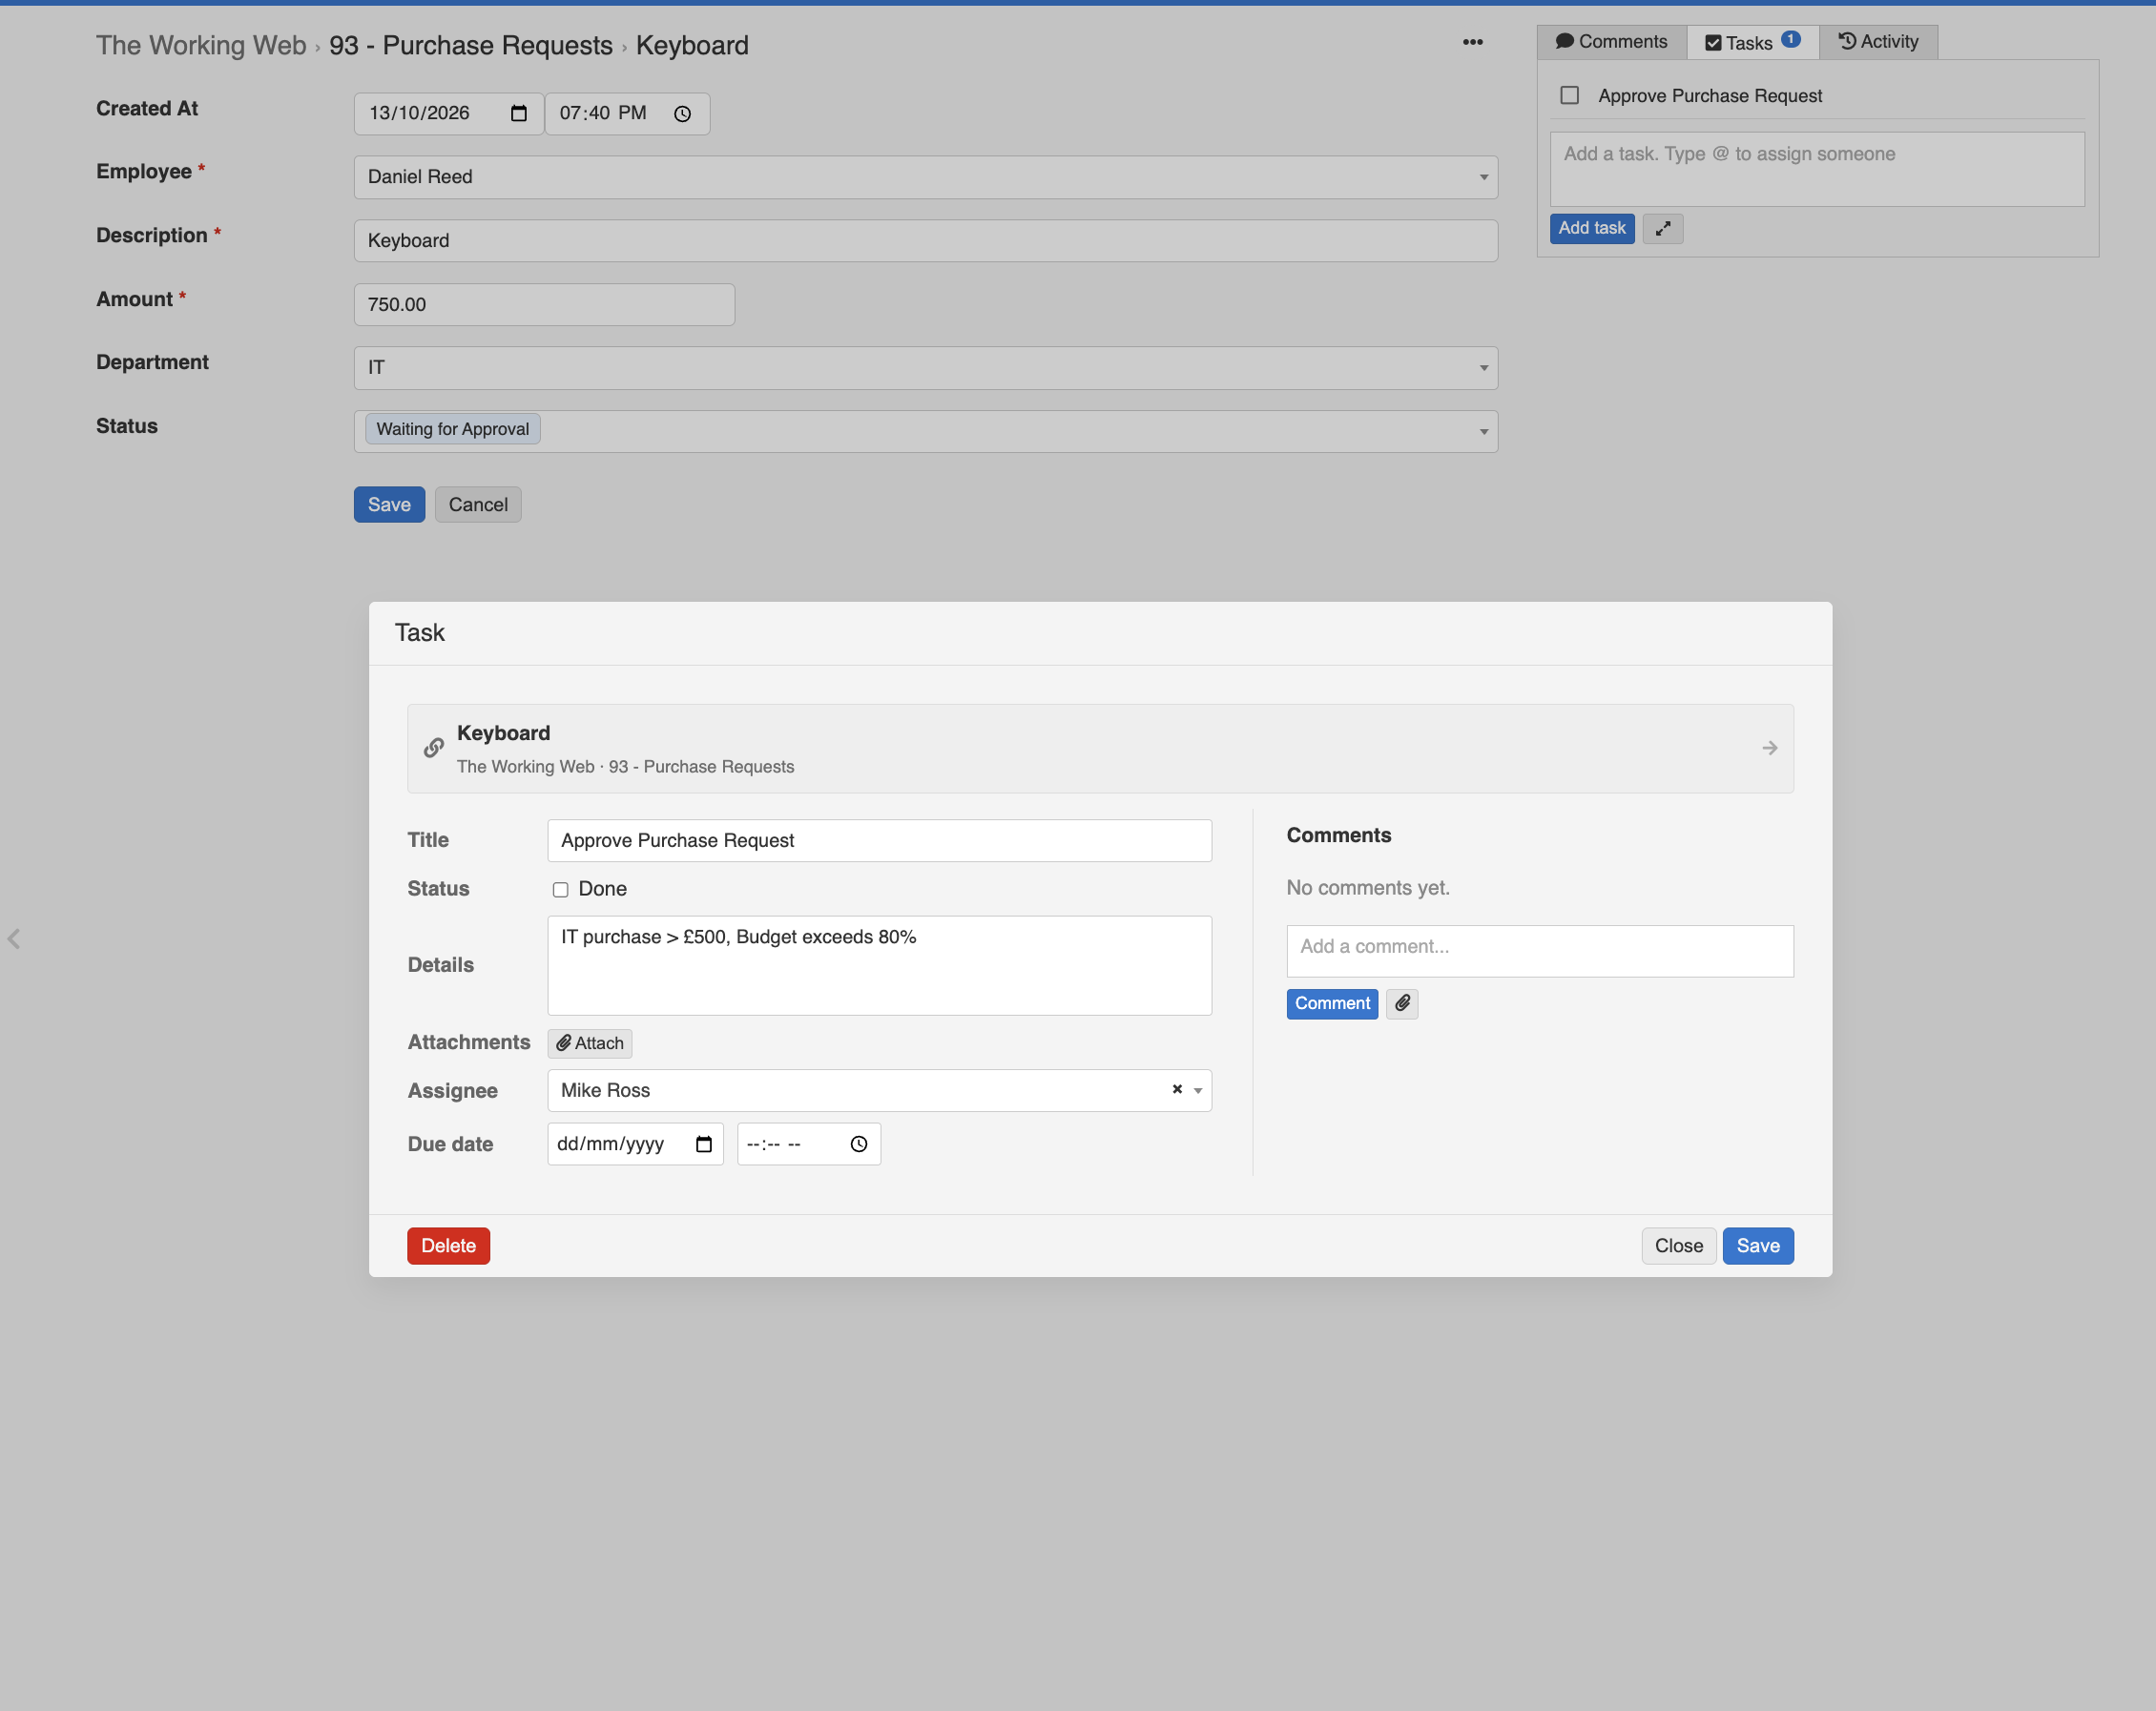
This is the important result.
Multiple independent rules have been evaluated, their explanations have been combined, and the manager receives one approval task instead of several.
We achieved the same business outcome with a much smaller piece of code than the corresponding visual flow.
When to use the builder and when to use code
The lesson isn't that visual builders are unsuitable for complex workflows.
We successfully implemented the extended approval policy using visual bricks.
The difference is how easily the logic can be understood and maintained as requirements grow.
For a straightforward process with a few conditions, the visual builder is an excellent starting point. You can see the sequence of actions, understand the branches, and make changes without writing code.
For a growing set of interconnected business rules, code can provide a clearer representation.
In our example, the extended visual workflow required numerous branches, variables, and actions.
In Code Mode, the core approval policy became a series of readable conditions followed by one task-assignment operation.
And importantly, both approaches use the same underlying PHPScript runtime.
You don't have to decide at the beginning whether a workflow should be visual or code-based.
You can start visually, get the process working, and move into code when the complexity justifies it.
The visual flow wasn't incapable of handling the requirements. It had simply become harder to maintain than the equivalent code. The useful part is that moving to code didn't require a new runtime, a separate automation service, or rebuilding the workflow from scratch.
Easy to start. Hard to outgrow.
FAQ
Can I convert a code flow back into visual bricks?
No. Convert to Code is one-way. Clone the visual flow before converting if you want to keep a version you can edit with bricks.
Is Code Mode a different language or runtime?
No. Visual bricks compile to PHPScript, and Code Mode runs PHPScript in the same automation environment. Triggers, the $record and $before variables, and the record functions are identical in both.
Do I need to know PHP to use Code Mode?
It helps, but it is not required. PHPScript looks and behaves like PHP, and converting a working visual flow gives you a commented starting point to learn from. The PHPScript basics page covers the rest.
Can a visual flow handle complex logic at all?
Yes. The builder supports conditions, variables, arrays, record queries and loops, and the extended approval policy in this post was built with bricks first. Code Mode is about readability and maintenance once the rules start interacting, not about missing capabilities.