Tables and Fields
Tables turn database rows into usable business screens: searchable grids, record forms, related records, and field-specific validation.
Add a table
From the workspace overview, open the workspace menu and choose Add Table. Select an existing database table or create a new one.
Admins can configure the table from the table menu. The Configure screen has three tabs:
- General — table name and a Hide from Overview flag. A hidden table stays fully usable, but it is kept off the workspace overview and its updates are kept out of the activity feeds for everyone in the workspace.
- Fields — the field designer (see below).
- Web Forms — manage public submission forms (see Web Forms).
Save commits General + Fields together. Press Ctrl+S (or Cmd+S) at any time to save and stay on the page.
Configure fields
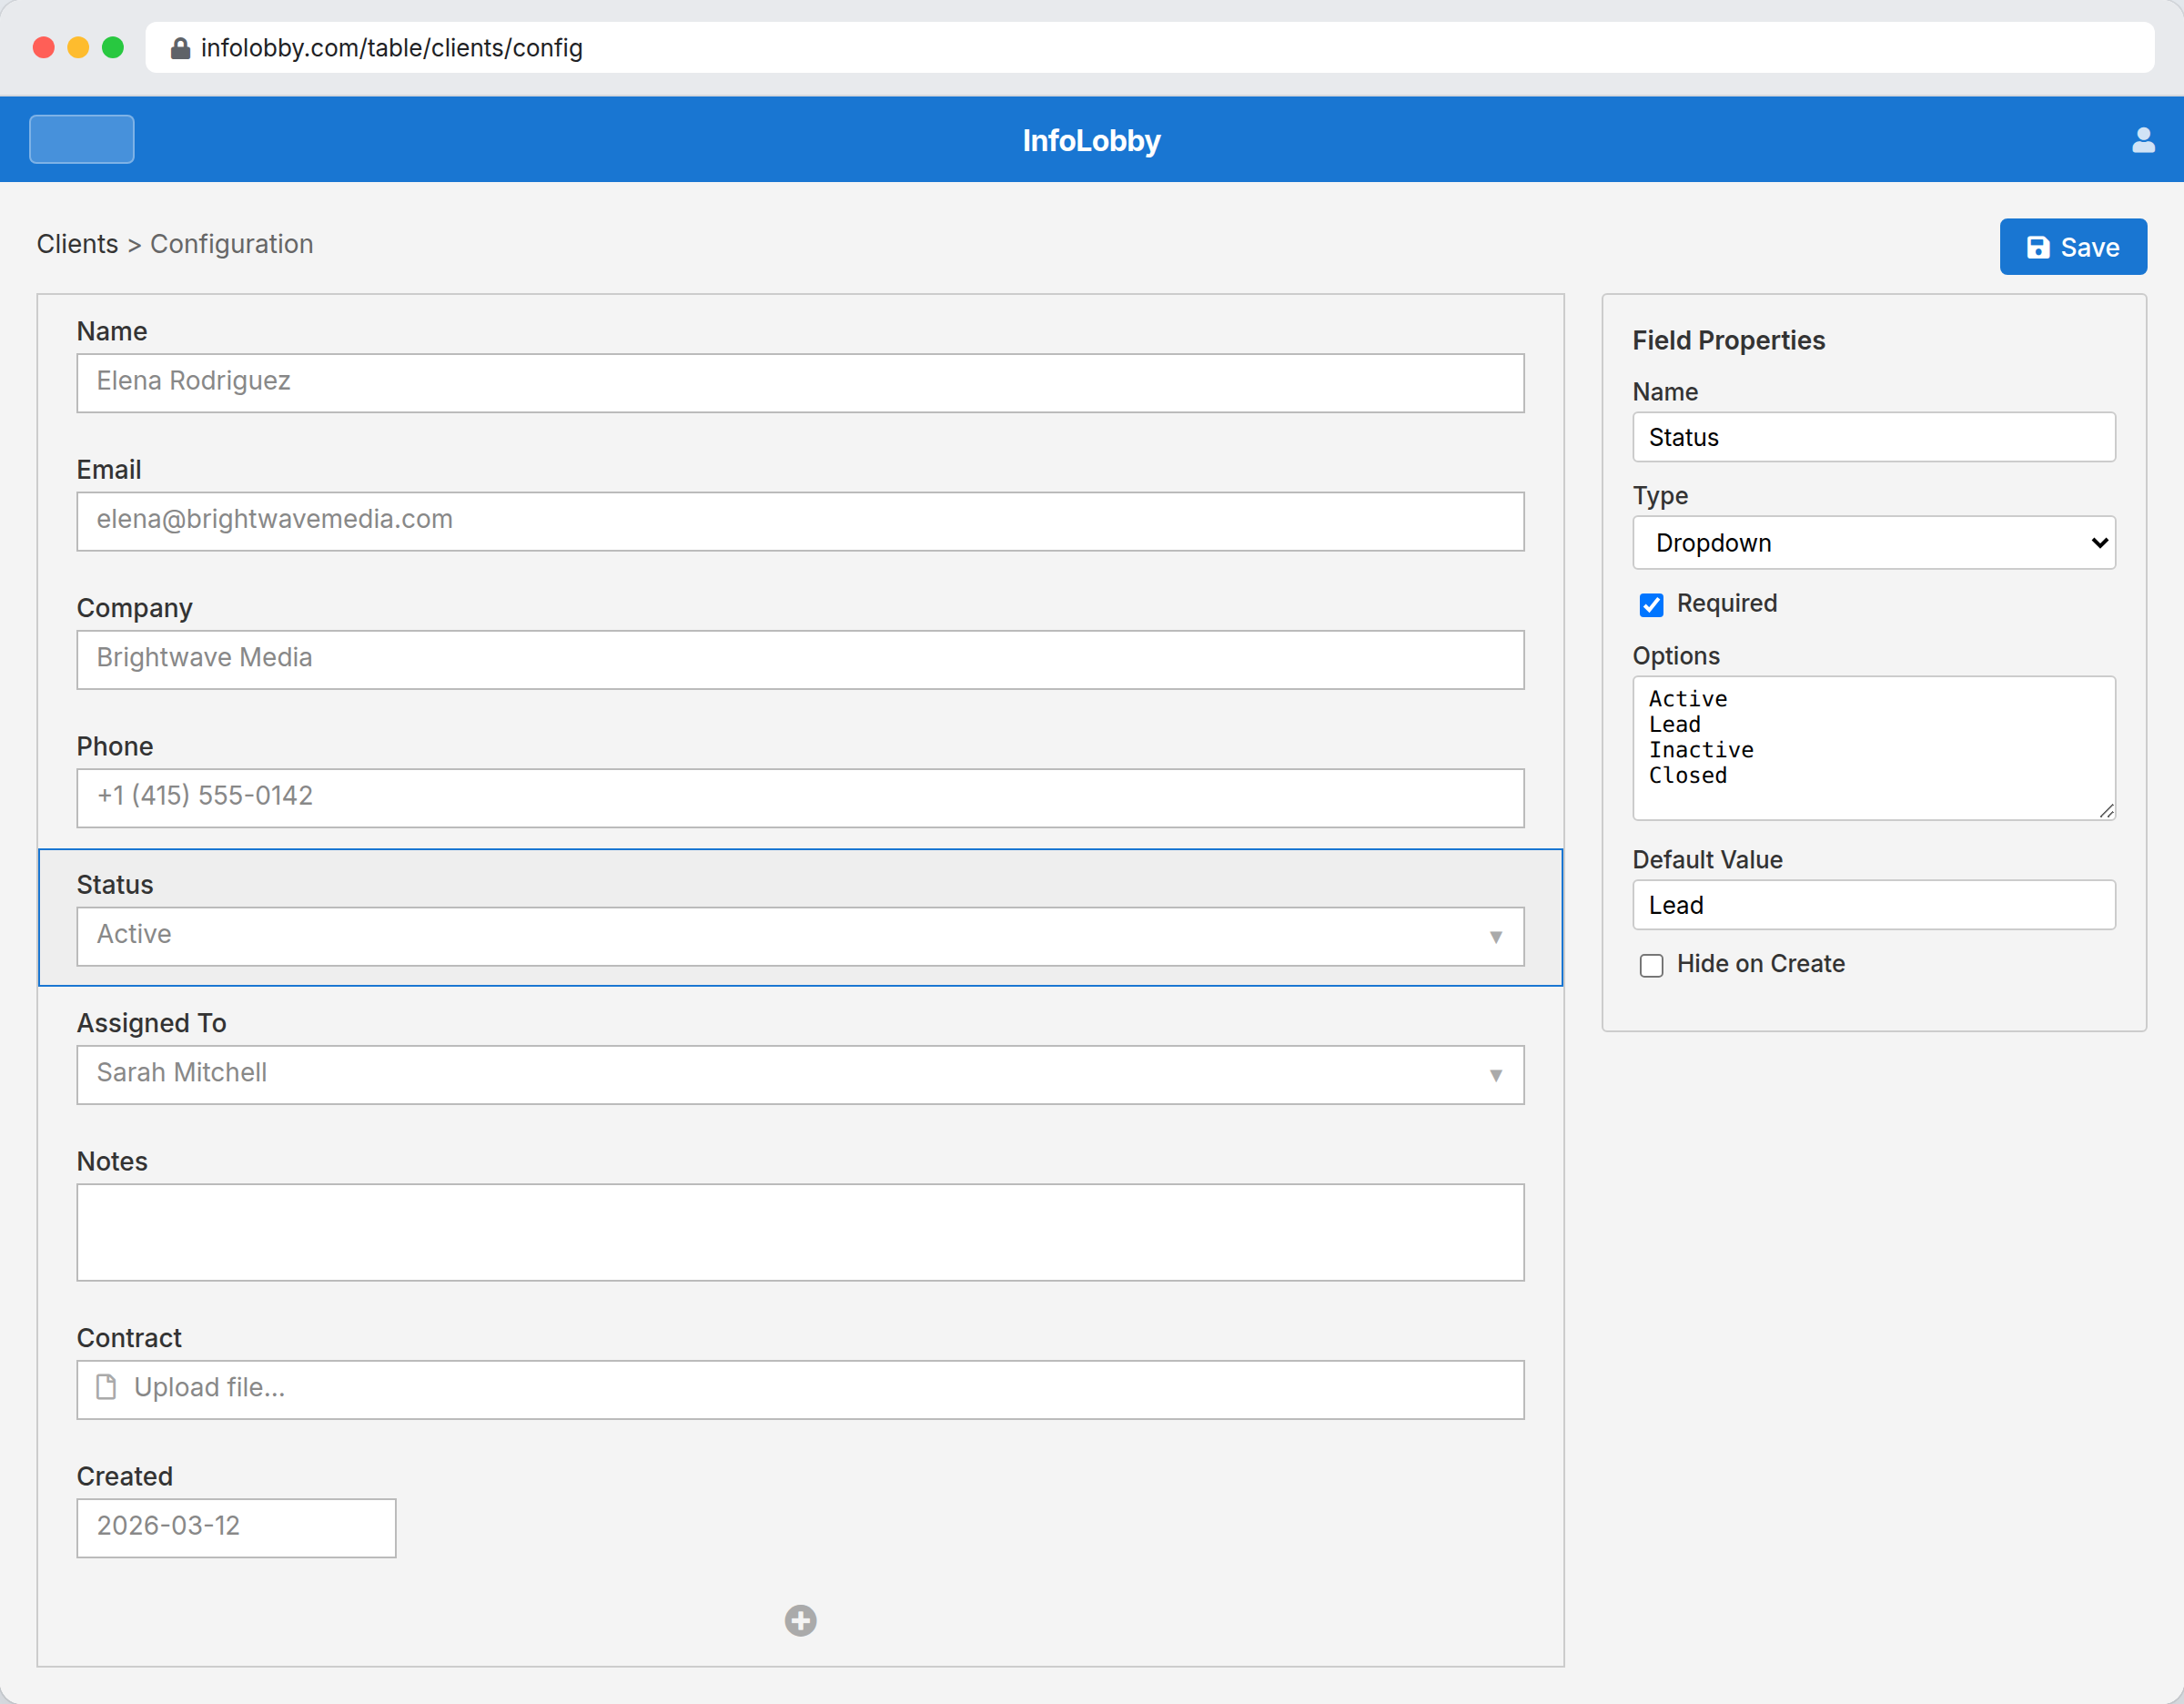
Click a field in the form designer to edit its settings.
Common settings:
| Setting | Purpose |
|---|---|
| Field Label | User-facing name |
| Help Text | Optional short note shown subtly under the field on the record detail page and on public web forms — use it to explain what to enter. Leave blank for none. |
| Required | Blocks save when empty. The field's label carries a red * on the record form and on public web forms, so people can see what's needed before they try to save. Enforced on the server too, so the API, automations and PHPScript can't slip an empty value past it. |
| Hide on Create | Shows only after the record exists |
| Hide if Empty | Hides the field on existing records while it has no value. It still appears on the create form unless Hide on Create is also enabled. Reveal via Show Hidden Fields in the record's ellipsis menu. |
| Always Hidden | Never visible by default. Hidden in the record form, in grid columns, and in summary layouts (calendar, kanban, gallery). Reveal in the record form via Show Hidden Fields. A saved view can opt back in for its own columns or card lines (see below). Webforms and the API are unaffected. |
| Admin Only | Editable only by workspace admins. Non-admins see the field greyed out with a lock icon on the record form. If every editable field in a table is Admin Only, non-admins can't add records — the New button is disabled for them. |
Required + Always Hidden together: save is allowed while the field stays hidden; the requirement only enforces once the user reveals the field with Show Hidden Fields (which is also when the red * becomes visible).
Showing an Always Hidden field in a view. Always Hidden is about the record form. A common pattern is a First Name field, a Last Name field, and a Calc that joins them: you want the calc out of the form, but you still want to see it in the table. Open Layout Options from the layout picker and tick Show Always Hidden fields. Those fields then appear in the column list (and in the secondary line picker for kanban and gallery) so you can add them. Save the view and the choice sticks with it. The setting belongs to that one view, so the Default view and every other view stay clean. Related-record tabs have the same option in the table's Fields tab, on the tab's config panel.
Two things to keep in mind. The field stays hidden in the record form either way, which is the point. And if you embed a view that shows Always Hidden fields on a public page, those values are public like any other column in that view.
Required + Admin Only: a non-admin can't edit the field, so it isn't marked for them and doesn't block their save. Derived fields (Calc, Rollup, Button, Script) have no Required option, since nobody types into them.
Two deliberate exceptions to server-side enforcement: imports (CSV, Excel, workspace restores, app packs, Podio) are allowed to bring in incomplete historical rows, and the hidden-field combinations above stay unenforced everywhere, not just in the browser.
Related record tabs
When another table links to this one with a lookup field, its records show as a tab below the field designer (and, for end users, as a sub-table on each record — see Related records). Each tab lists here on the Fields screen so you can tune how it appears:
- Reorder — drag a tab by its label to change the order the tabs appear in on the record.
- Show Fields: pick which columns of the related table the sub-table shows. Button fields can't be shown as columns; run them from the record itself.
- Sort by — choose a field and direction to order the related records (default is newest first).
- Filter — show only related records matching one condition (field + operator + value).
- Hide this tab — remove the tab from the record screen entirely. It stays here (greyed out) so you can bring it back later.
Click a tab to open its settings in the side panel. These settings save with the rest of the table (Save or Ctrl/Cmd+S) and apply for everyone viewing the table's records.
Related record tabs show independent records that link back via a lookup. If instead you need repeating detail rows that belong only to this record and save with it — invoice lines, order items — use a sub-table.
Field types
Use field types to make data entry cleaner: text, long text, number, date, select, checkbox, lookup, file, links, and read-only fields. For live derived values — totals, statuses, days until due, related counts — use a Calculation field. For a stored total of a record's line items, use a Rollup field (see Sub-tables). When a derived value needs code, a query, or formatted HTML rather than a SQL formula, use a Script field. To have someone sign a document held on the record, use a Signature field. To let people outside your team sign in and reach their own records, give the record a Password field: it is checked at sign-in by a Portal and can never be read back, by you or by anything else.
Date fields have a Data Type setting for what the column actually stores — Date (a calendar day, the default), Date & Time, or Time. Pick it when you create the field: it is the underlying column type, so changing it later rewrites the column. Date & Time values are stored in UTC and shown in your own timezone. Tick Current Date/Time to prefill new records — a Date field gets today's date in your own timezone, and a Date & Time field gets the current moment. Sub-table columns offer the same Data Type setting (but no default).
Field defaults apply to every new record, not just ones typed into a form: a record created through the API, a flow, or a web form gets the same defaults for any field it doesn't set. Passing a field explicitly as empty is treated as a deliberate blank and is left alone. Imports are the exception — a CSV/Excel import, a Podio import, or a workspace restore never fills in defaults, so historical rows keep the blanks they arrived with.
Long text (Text Area) fields have a Format setting that changes how you write and read the value:
- Plain Text — a simple multi-line box.
- HTML Rich Text — a formatting toolbar (bold, lists, links, images); the record detail shows the rendered result.
- Markdown — a rich (WYSIWYG) editor: type and see formatting inline (headings, bold, lists, tables), with a Markdown/WYSIWYG toggle for editing the raw source. The value is stored as markdown; the record detail shows it rendered, and grids show it as plain text.
- JSON — a code editor that pretty-prints your JSON and flags syntax errors as you type. A field with invalid JSON can't be saved until you fix it (an empty field is fine).
Select fields support per-option colors. In the option editor, click the color swatch next to an option to pick a light background, or pick No color (the first swatch) to leave the option unstyled or clear a color you set earlier. The color renders behind the option in grid cells, on the record detail page, and inside the dropdown or checkbox control. Colors are restricted to a fixed light palette so contrast stays readable.
File (attachment) fields hold uploaded files. Tick Image Only in the field settings to restrict the field to images — non-image uploads are rejected, and an image-only field shows its files as larger image cards on the record detail (like the gallery view) instead of a plain file list. Click a card to view the image full size.
Links fields store one or more web links. Paste a URL (it must start with http:// or https://) and click Add; tick Allow Multiple Links in the field settings to store several. On the record detail page each link shows a rich preview card — title, description, and image or site icon pulled from the page — and clicking opens the link in a new tab. Previews are fetched once and cached, so repeat views stay fast. Paste a link to another record inside your own workspace and the card shows that record's title and where it lives (its table and space) instead of a generic page description — provided you have access to it. In grids and public embeds, links show as a compact site name. A few sites block automated preview requests; those cards fall back to the site name alone, and the link still opens normally.
Lookup fields connect records across tables. If another table looks up this table, related records can appear in tabs at the bottom of the record form. Tick Allow Multiple in the field settings to link several records in one cell; matching records show as a list. User fields work the same way — tick Allow Multiple to assign several workspace members to one record, shown as avatar chips.
Button fields show a button on the record detail page that runs an On-Demand flow on that record. In the field settings, pick the flow to run, set a button label, and optionally a confirmation message (or tick Skip confirmation) and a color. When a Read & Write user (or admin) clicks the button, they confirm, then a progress window streams the flow's run and shows any error; on success a brief message appears and the record refreshes with whatever the flow changed. The button is disabled until the record has been saved. Mark the field Admin Only to limit the button to workspace admins. Button fields store no value and don't appear on web forms.
Once a multiple field holds records with more than one value, you can't switch Allow Multiple back off until you reduce those cells to a single value — this protects you from silently losing data.
A lookup can target a table in the same workspace or any other workspace that shares the same database. The picker shows the current workspace's tables by default; start typing to also see matches from other workspaces, which appear as Table (Workspace). Cross-workspace lookups work for direct record selection. Flows that read through a cross-workspace lookup must still list the foreign workspace under the flow's Additional Workspace Access setting.
If a lookup points at a workspace you don't have access to, its field is shown locked (with a lock icon) on the Fields screen — you can't edit or remove it, but you can still freely edit and save every other field on the table. To change or remove such a lookup, ask someone with access to the target workspace.
To narrow the choices a lookup offers, pick a View in the field settings. When a view is set, the record picker only lists records from the linked table that match that view's filters — handy for scoping a lookup to, say, only Active customers. Leave View blank to allow every record. The view is a soft filter on the picker only: records already linked before you set the view keep showing normally, even if they fall outside it.
Validation
Beyond per-field settings like Required, a table can carry a validation rule — one PHPScript that runs before every create, update, and delete and can block the write with a message. It's how you enforce rules that span fields or depend on data: "a deal can't be won without a close date", "a posted invoice can't be changed", or "this table is only editable through the API and automations". Set it on the General tab of the Configure screen — see Validation rules.
Record Lock
A table can also be locked to a User field, so each member only sees — or only edits — the records assigned to them: a Leads table where every rep works their own leads, or a Requests table anyone can browse but only the assignee can update. Admins always see everything, and automations are unaffected. Set it on the Fields tab of the Configure screen, on the User field itself, alongside options like Required and Admin Only. See Record Lock.
Developer Info — technical names
Automations, PHPScript, and the API don't address a table by its label — they use its underlying table name, its table ID, and each field's column name. To look these up, open the table's Configure screen, click the ellipsis (…) menu top-right, and pick Developer Info.
The window shows the table's label, its table name (what flows and PHPScript reference), its table ID (what API paths like /api/table/101/records use), its workspace ID, and a list of every field with its label alongside its column name. Column names are what you use as field keys when reading or writing records.
Fields you've added but not yet saved have no column name — it's assigned when you save. Calc, button, and script fields are computed and have no database column, but their name is still how the API and tokens refer to them.
Moving a table to another workspace
In the table configuration screen, the ellipsis (…) menu has a Move Table option. You can move a table to any other workspace in the same database where you are an admin. Records, comments, views, webforms, and flows attached to the table move with it. Lookups from other tables to this one continue to work after the move. If a flow in another workspace references the source workspace via Additional Workspace Access, you may need to update that flow's setting to keep it pointing at the new location.
Deleting a table or workspace
Deleting a table or workspace in a managed workspace permanently drops the underlying database tables and queues the attached files for deletion (30-day grace period before they're removed from storage). For workspaces, the delete shows a progress modal as each table is dropped.
For external (BYO) databases and storage, the default is to "remove" only InfoLobby's mapping — your database tables and files in storage stay untouched. The delete dialog offers two opt-in checkboxes:
- Also drop the underlying database table(s) — issues
DROP TABLEagainst your external MySQL. - Also delete files in attached storage — deletes every file for the table or workspace from your external S3 / FTP storage. There is no grace period for external storage — the deletion is immediate.
If you check either box, the delete runs through a progress modal so you can watch it work. If the database or storage credentials are dead, the operation aborts before InfoLobby removes its own metadata, so you can fix the connection and retry.
Tables that link to this one. If a lookup field in another table points at the table you're deleting, the delete dialog lists those fields and lets you choose what happens to them:
- Delete these fields — the lookup fields are removed from the other tables.
- Convert them to text — each lookup becomes a plain text field, keeping the names of the records it currently links to as labels, so you don't lose the history.
Either way the referencing tables keep working after the delete — without this, a leftover lookup pointing at a deleted table would show a database error when opened.